The Nucleone tool enables users to identify dyad positions from a nucleosome occupancy profile, in
which the x- and y-axes represent genomic coordinates and dyad counts, respectively. The dyad position
is defined as the midpoint nucleotide of the 147-bp nucleosomal DNA fragment. The dyad count is the total
number of DNA fragments whose midpoint corresponds to a specific genomic coordinate (Figure 1). The algorithm
first smooths the nucleosome occupancy profile and then scores each genomic coordinate using sequence features
associated with nucleosome positioning that were identified in our previous study published in
Nucleic Acid Research. The tool outputs a list of dyad positions
identified through the processing of the nucleosome occupancy profile. All implemented programs
are compatible with Windows, macOS, and Linux, and the source code is freely available under the MIT License.
Figure 1. Schematic representation of nucleosomal DNA and minor groove sites facing inward and outward
relative to the histone octamer. Nucleosomal DNA wraps around the histone octamer and consists of approximately 147
base pairs. The midpoint nucleotide of the 147-bp DNA sequence is referred to as the dyad position.
Input and output
Nucleone requires three parameters. The first two parameters specify two input files in TXT format:
(i) a DNA sequence and (ii) the dyad count for each nucleotide in the input DNA sequence. Both input files
must be provided in plain-text format. The third parameter specifies the prefix for the two output files,
which share the same name but use different file extensions. The first output file contains the smoothed dyad
counts associated with the input nucleosome occupancy profile and the genomic coordinates identified as potential
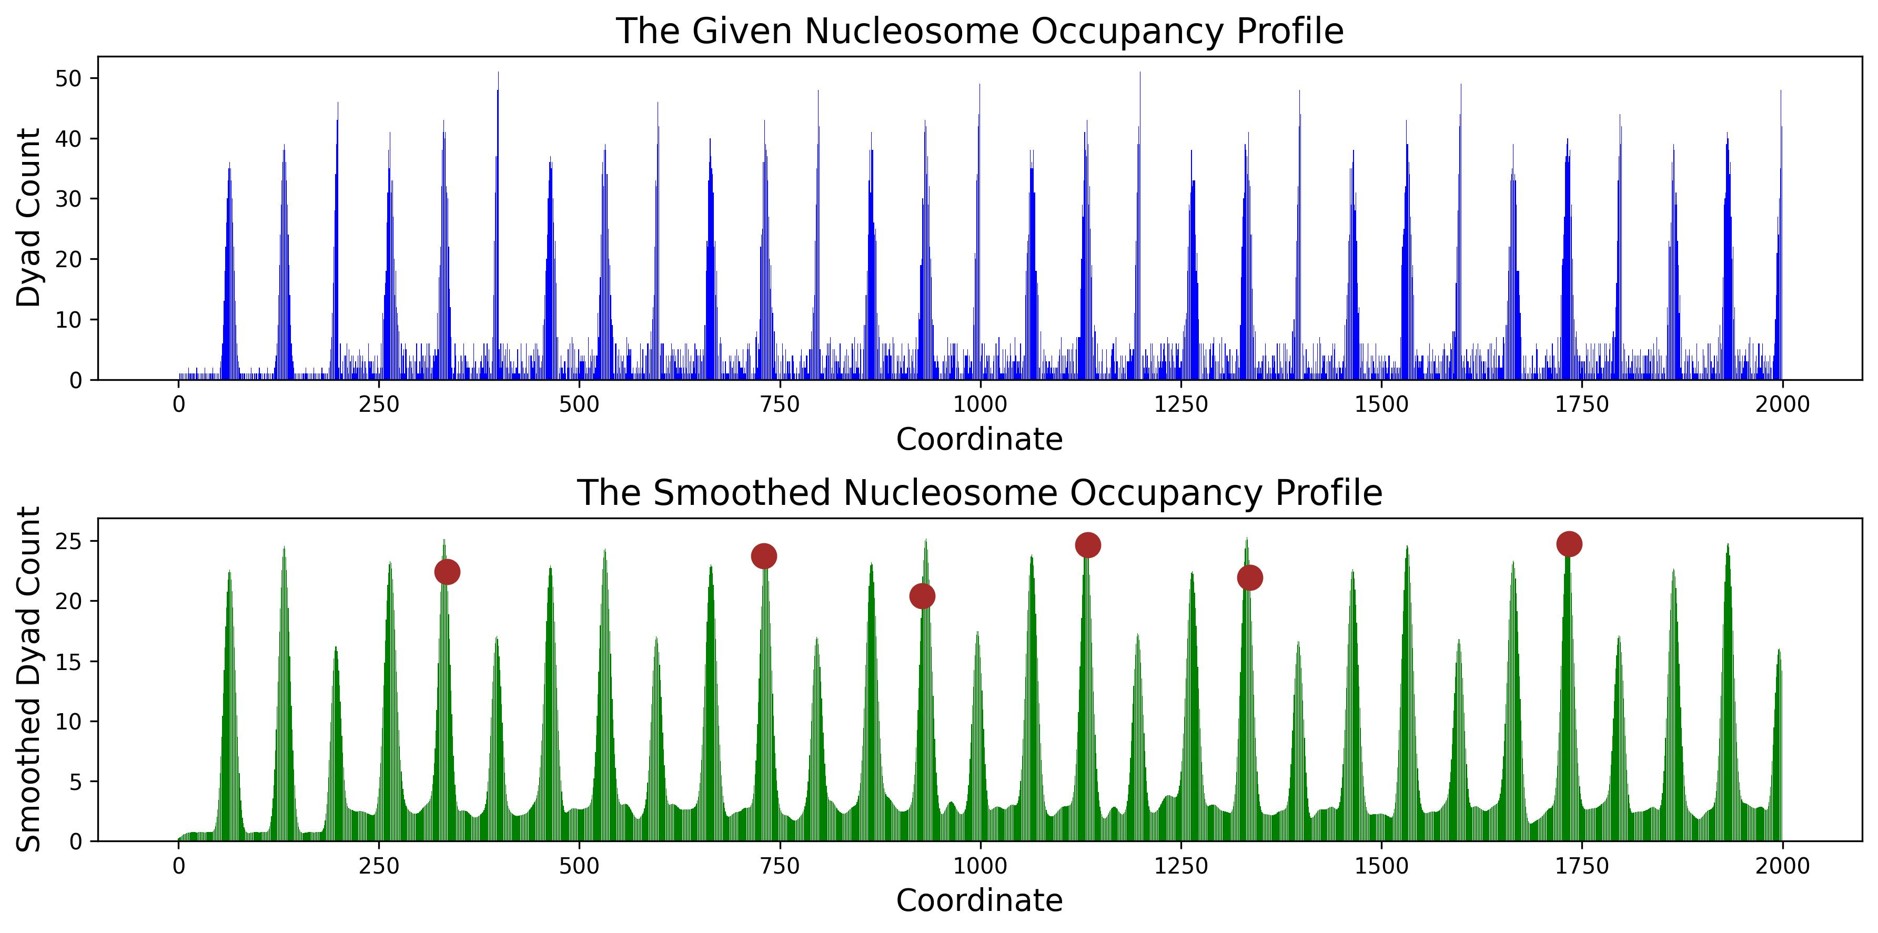
dyad positions. The second output file is a JPG image showing both the input and smoothed nucleosome occupancy
profiles, with brown dots highlighting the identified dyad positions.
The DNA sequence file must contain the nucleotide sequence. The dyad count file must contain the dyad count for each
nucleotide in the DNA sequence file, with individual dyad counts separated by commas (,). Examples of the input
files are available in the Download section of the Nucleone website:
https://nucleone.org/DS. After processing
the input files, Nucleone generates an output file containing the smoothed dyad counts and the identified
dyad positions. In addition to its primary application of identifying dyad positions from a DNA sequence
and nucleosome occupancy profile, Nucleone provides a dyad position classifier. The classifier takes a
201-bp nucleotide sequence as input and predicts whether its midpoint nucleotide corresponds to a dyad position.
The web-based version of Nucleone currently supports DNA sequences with a maximum length of 1,000 nucleotides
for dyad identification. For the dyad position classifier, it supports up to 500 input sequences, each 201 bp
in length. These limits are imposed to ensure that hardware resources are fairly shared among users. For larger
input datasets, users are recommended to install and use the standalone version of Nucleone.
The dyad identification program
We deployed the dyad identification program on the Python Package Index
(PyPI,
https://pypi.org/project/Nucleone/), providing users with a
stable and straightforward installation method.
The standalone dyad identification program is implemented in basic Python and only requires only the matplotlib library
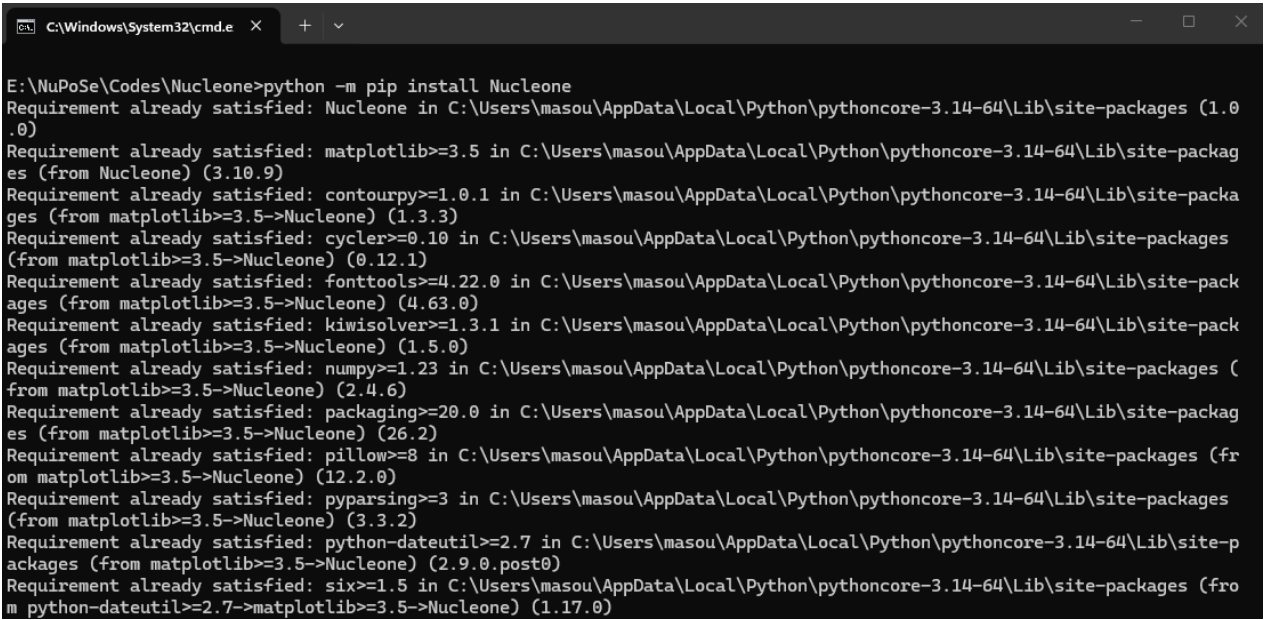
as a prerequisite. To install Nucleone, users can run the following command in a command-line interface,
as shown in Figure 2:
python -m pip install Nucleone
Figure 2. Command-line installation of Nucleone from the Python Package Index (PyPI).
Please note that Python is case-sensitive. Therefore, Nucleone and nucleone are treated as different names in Python.
It is also important to ensure that the Python interpreter and the pip package manager refer to the same Python installation.
For example, if the default Python version is 3.14 but the pip command is associated with Python 3.13, a package
installed using pip may not be accessible from Python 3.14. Figure 3 illustrates a situation in which pip is associated
with Python 3.13, whereas the default Python version is 3.14.5.
Figure 3. Commands for checking the versions of Python and pip.
Users can check the Python version by running:
python --version
and the pip version by running:
pip --version
If these commands report different Python versions, users should install Nucleone using:
python -m pip install Nucleone
rather than:
pip install Nucleone
Using python -m pip ensures that pip is executed through the Python interpreter specified by the python command.
After installing Nucleone, users can import the package and provide the input and output file paths. The following
commands can be executed in the Python environment, as shown in Figure 4:
import Nucleone
SequenceFile = "The path to the input DNA sequence file"
DyadCountFile = "The path to the input dyad count file"
OutputFile = "The path to the output file"
Nucleone.Nucleone(SequenceFile, DyadCountFile, OutputFile)
Figure 4. Commands for importing and running the standalone version of Nucleone on Windows 11.
The input and output files are shown in the right-hand panel. Figure 5 presents the results obtained by applying
Nucleone to the example input files available on the Nucleone website.
Figure 5. An example of the JPG-format output file generated by Nucleone. The blue curve represents the
input nucleosome occupancy profile, with the x- and y-axes showing genomic coordinates and dyad counts, respectively.
The green curve represents the smoothed nucleosome occupancy profile. Both curves have the same length and correspond
to the same genomic coordinates. The brown dots indicate the dyad positions identified from the input nucleosome
occupancy profile.
The Classification Program
The primary application of Nucleone is dyad identification from a nucleosome occupancy profile.
This work extends our previously developed classifier, NuPoSe, which distinguishes nucleosomal
and non-nucleosomal DNA. The NuPoSe classification program and the dyad identification method (Nucleone)
are independent programs with no functional dependencies. The NuPoSe classification program uses a
prediction model built with Keras 2.7.0 and TensorFlow 2.7.0. Therefore, users should install these
specific versions to ensure compatibility with the prediction model. The numpy library is also required
to run the classifier. We recommend using a Python virtual environment on Ubuntu to install and run the
NuPoSe model. A virtual environment can be created and activated with the following commands:
python -m venv MyEnvironment
source MyEnvironment/bin/activate
Here, MyEnvironment is an arbitrary name assigned to the virtual environment.
After creating and activating the virtual environment and installing the required dependencies,
users can download the NuPoSe model from the GitHub repository using the following command:
wget https://github.com/Panchenko-Lab/NuPoSe/archive/refs/heads/main.zip
The downloaded file should then be unzipped, and the working directory should be changed to the directory
containing the NuPoSe model:
unzip main.zip
cd NuPoSe-main/NuPoSe
The NuPoSe model is then ready for use. The model takes a text-format file containing 201-bp DNA sequences
as input and generates a prediction score for each sequence, indicating whether its midpoint nucleotide
corresponds to a dyad position. The prediction scores range from 0 to 1. A threshold of 0.5 can be used
to classify the input sequences. A score below 0.5 indicates that the midpoint nucleotide is not predicted
to correspond to a dyad position, whereas a score of 0.5 or higher indicates a predicted dyad position.
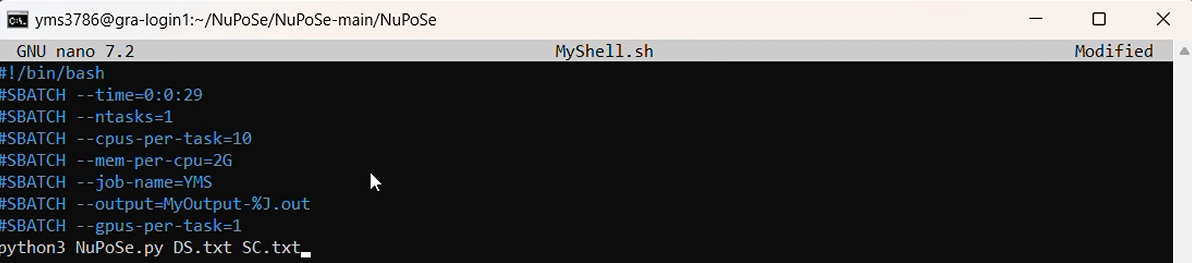
To run the NuPoSe model, users can execute the following command (an example is shown in Figure 6):
python NuPoSe.py Input.txt Score.txt
Here, Input.txt and Score.txt are the input and output files, respectively. Input.txt contains the 201-bp DNA
sequences, while Score.txt contains the corresponding prediction score for each input sequence. A demonstration
video is also available in the GitHub repository at
https://github.com/MasoudiYosef/NuPoSe. The video provides
a step-by-step demonstration of how to run the NuPoSe model.
Figure 6. Execution of the standalone version of the NuPoSe classifier using bash commands.
For technical support, please contact us at
yms3786@yahoo.com.